What it is and when it applies
This page helps you decide whether to buy after a bullish reversal candle at a support band, or to pass. The candle alone is a candidate. The trigger is a close above the pattern's high, the stop goes under the pattern and the band, and the distance sets the size.
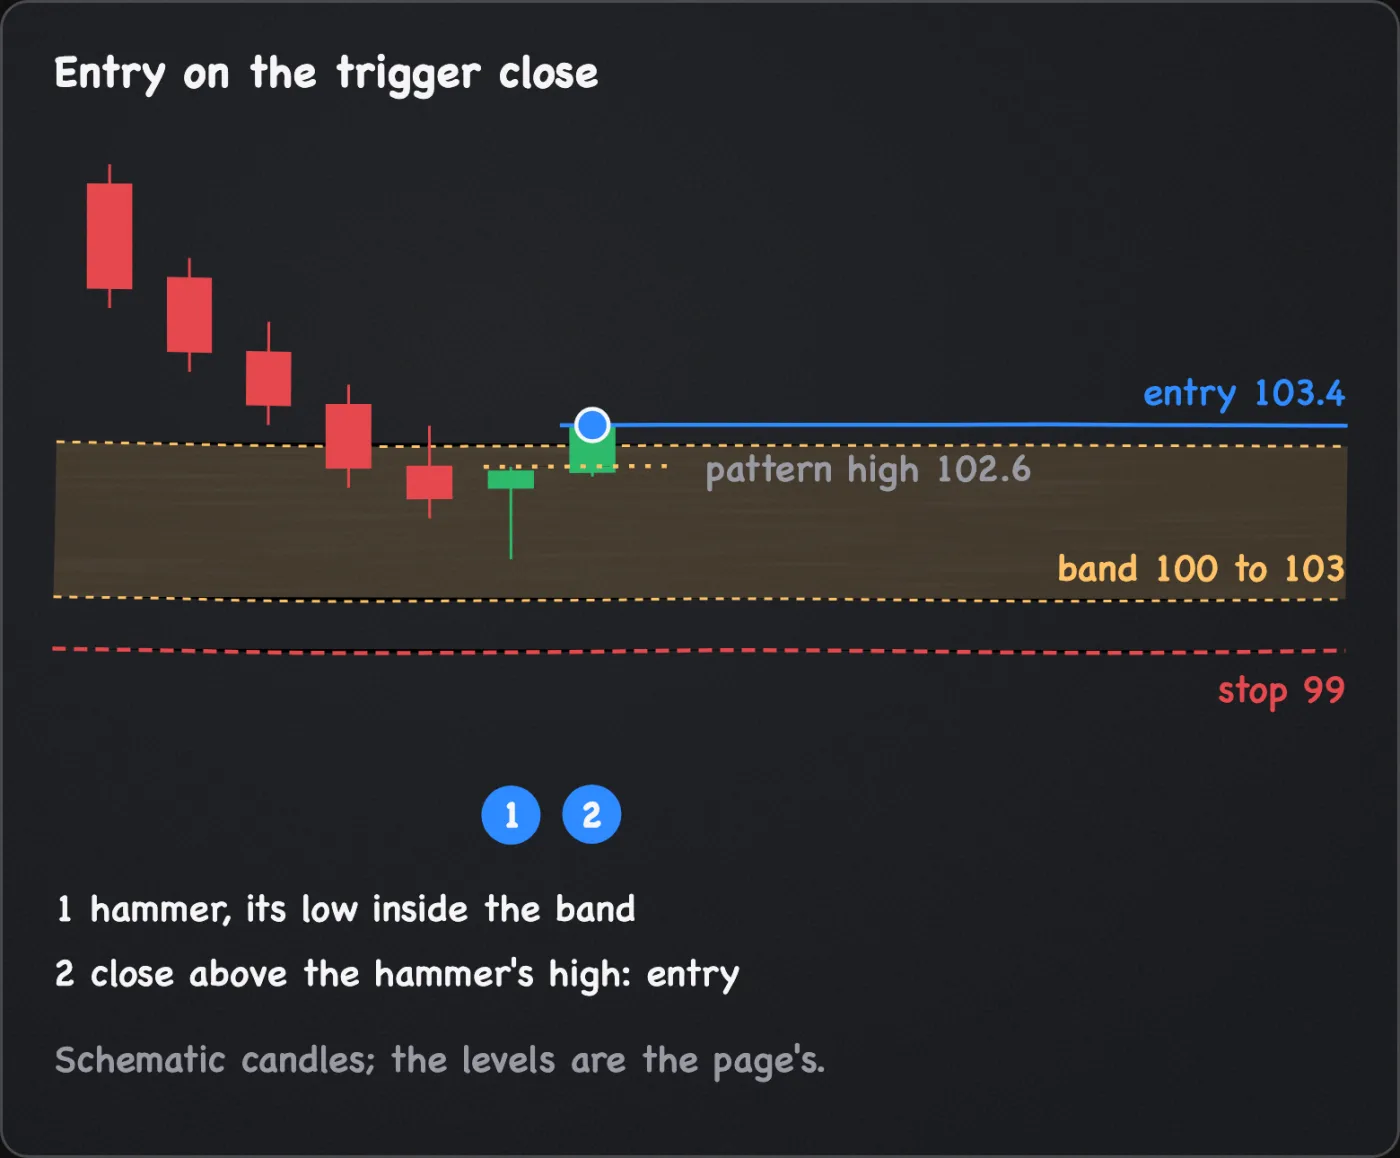
On the chart, price has fallen into a support band that was marked before the pattern. A hammer, a bullish engulfing candle or the third candle of a three inside up prints with its low in the band. Then a later candle closes above the highest high of the pattern. The shapes are defined on the candlestick reversal patterns page, with their wick ratio and the three context rules.
The belief is that a long wick or an engulfing body at a level shows buyers stepping in where they stepped in before. It is a belief, not a rule. Price can close back below the band, and this page cites no test of how often a pattern at support reverses. A wick into a band and a touch of the band are largely one observation, so the pattern adds less than it looks like it does.
It fits a band with a clear history after a fall that you can measure. It does not fit a market where the band was drawn after the candle, where the fall before it was brief, or where the band has already given way on the context chart.
Before you enter
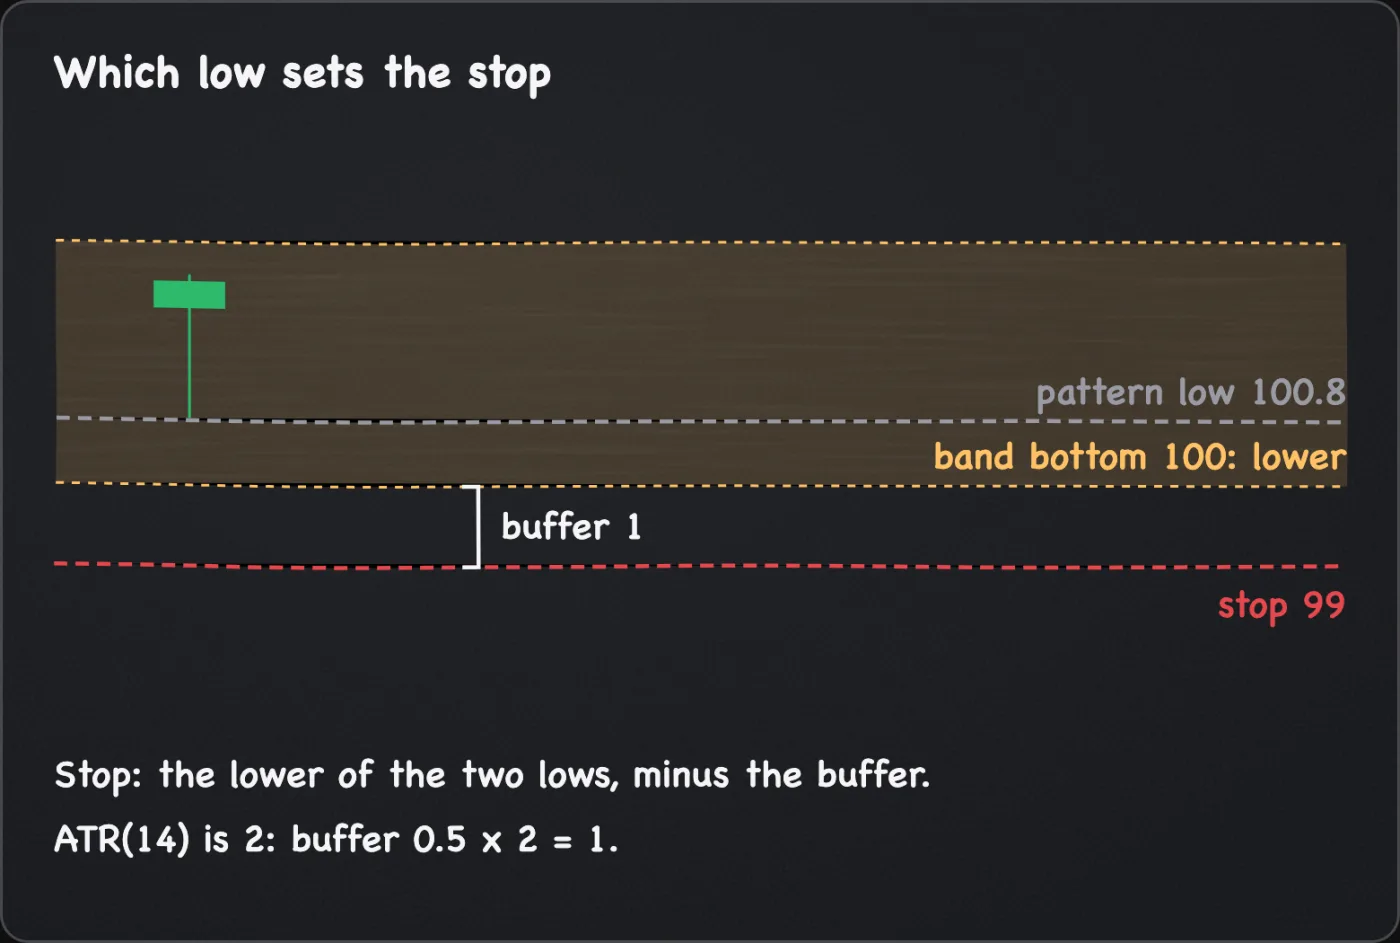
The long is wrong if a candle closes below the lower of the pattern's lowest low and the band's bottom edge. The support has then failed. The stop order goes beyond that lower level minus a buffer, so a wick through it while the idea is alive does not end the trade. The examples assume a buffer of 0.5 x ATR(14), the manual's usual convention and not a rule. A wider buffer takes a bigger move to reach and shrinks the position, and a tighter one does the reverse. Stop-loss placement explains the level, the close and the order.
This manual's house constraints are a planned loss of 1-2% of the account per trade and a 3x maximum leverage. They are choices, not a recommended allocation, and less, or no position, is always allowed. Sizing inputs:
- Account risk: the planned loss in cash, 1-2% of equity or lower.
- Entry price: the assumed fill, near the trigger candle's close.
- Stop price: the lower of the pattern low and the band's bottom edge, minus the buffer.
- Cost allowance: a per-unit amount for fees and slippage, added to the stop distance, plus funding for the planned hold. The examples assume 0.3 per unit, an illustrative figure (trading costs and liquidity covers it).
- Leverage cap: the leverage setting, and all open position values plus this one over account equity, 3 or less.
- Liquidation distance: the ticket's estimated liquidation price, below the stop for a long. If the gap is not wide, lower the leverage setting.
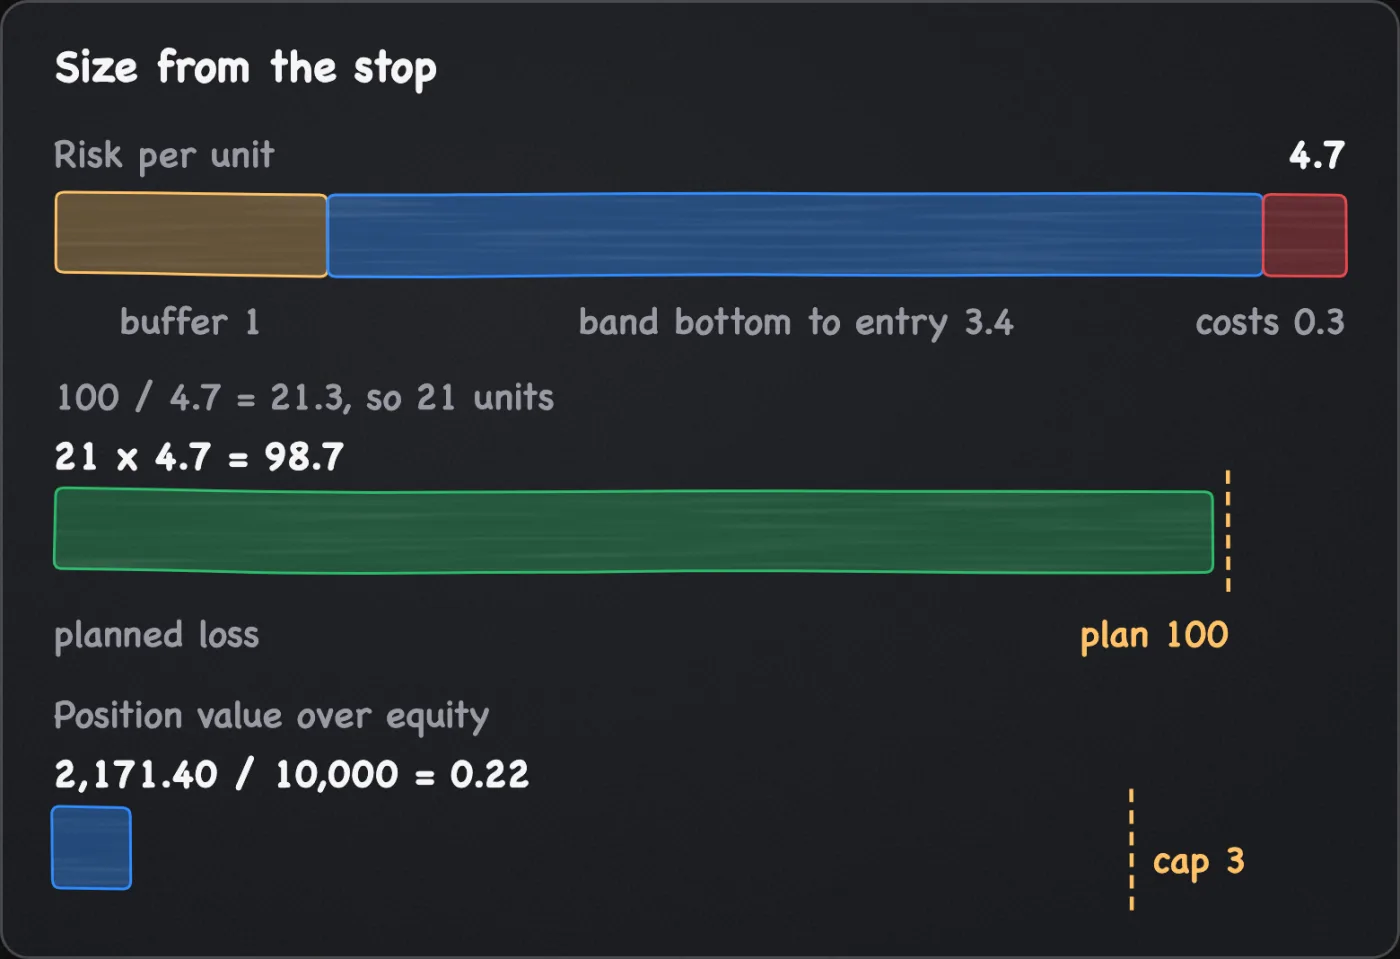
Units = planned loss / (entry minus stop, plus allowance), rounded down (position sizing has the sum). Units x (distance + allowance) is the planned loss if the stop fills at its price. A gap, slippage or funding can make the realised loss larger.
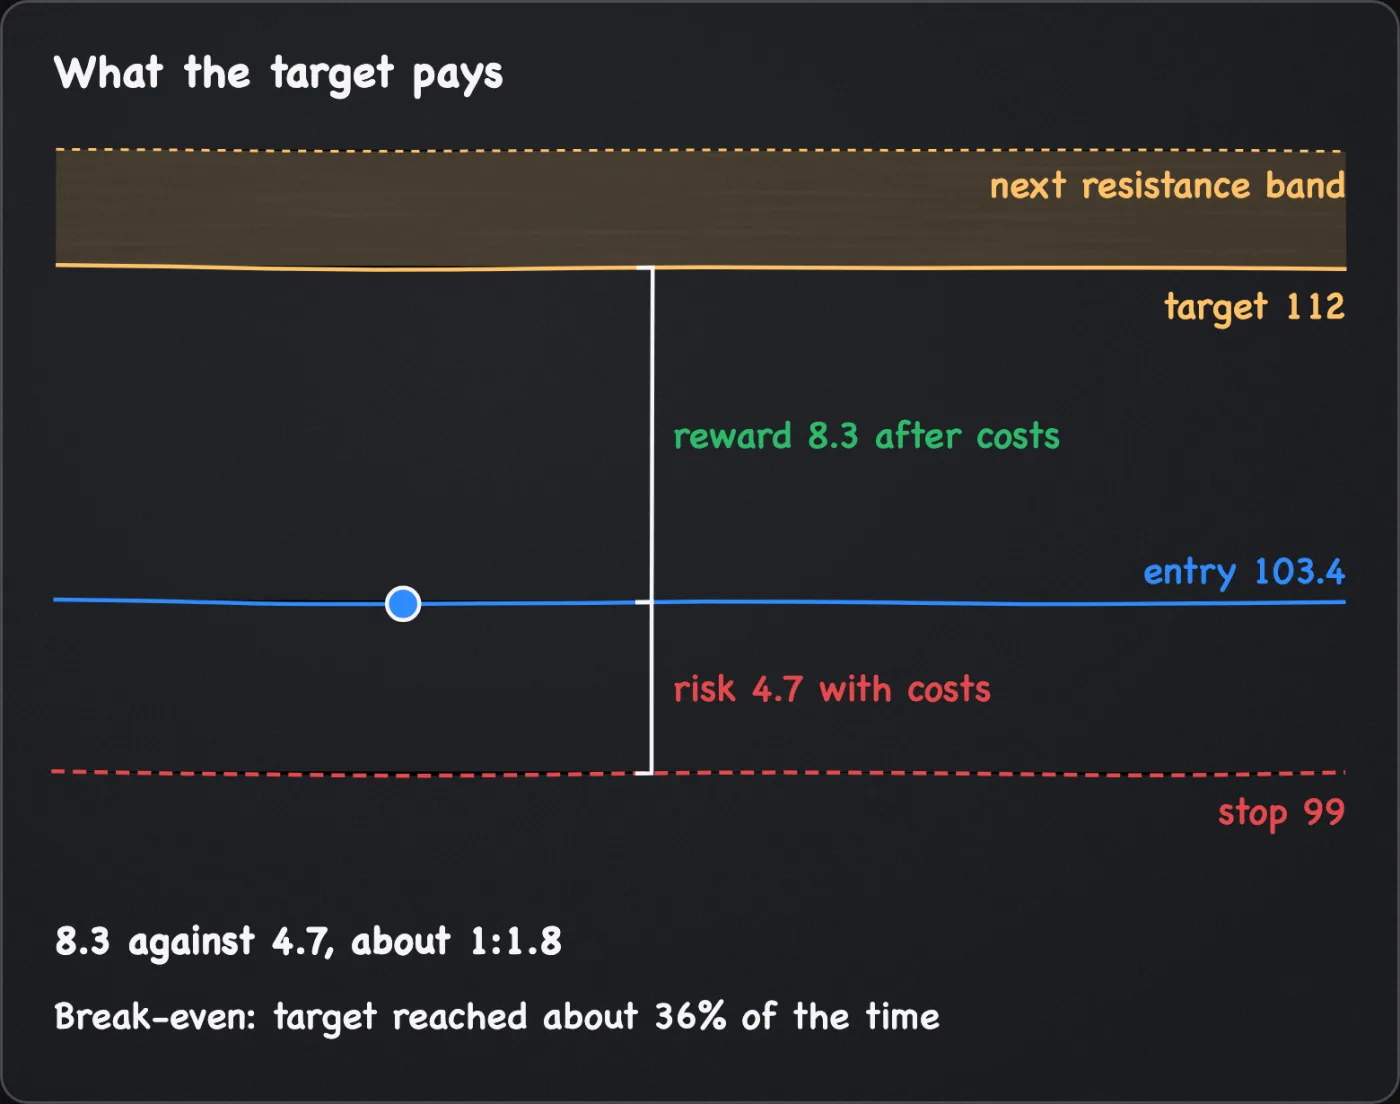
For arithmetic only, assume a 10,000 account, a planned loss of 1%, or 100, and ATR(14) of 2, so the buffer is 1. A support band runs from 100 to 103. A 4-hour hammer opens at 102.2, trades between 100.8 and 102.6 and closes at 102.5. The next candle closes at 103.4, above the pattern's high of 102.6. The lower of the pattern low (100.8) and the band bottom (100) is 100, so the stop is 99. Entry at 103.4 is 4.4 from the stop, 4.7 with the allowance. The size is 100 / 4.7, about 21.3, so 21 units (assume whole units), worth 2,171.40, or 0.22 of the account. The planned loss with costs is 21 x 4.7 = 98.7, and costs are about 6% of it.
Conditions
Each of these must be checkable on the chart. The thresholds marked as assumed are house choices that you write down before the trade.
- A prior fall, defined in writing. The highest high of the 10 candles before the pattern's first candle is at least 3 x ATR(14) above the pattern's lowest low (assumed).
- A band marked and dated before the pattern. The support band is two prices with three or more separate touches, a common convention, all on the chart before the pattern's first candle. A touch is separate when price left the band and came back, as the support and resistance page defines it. The pattern's low is inside the band, or below its bottom edge by no more than 0.5 x ATR(14) (assumed).
- The pattern. A hammer with a lower wick of at least 2x the body, a bullish engulfing candle, or the third candle of a three inside up, by the definitions on the candlestick page.
- The trigger. A decision-timeframe close above the highest high of the pattern's candles, within 3 candles of the pattern's last candle (assumed), with no close below the lower of the pattern low and the band's bottom edge in between. The third candle of a three inside up completes the pattern and is not the trigger.
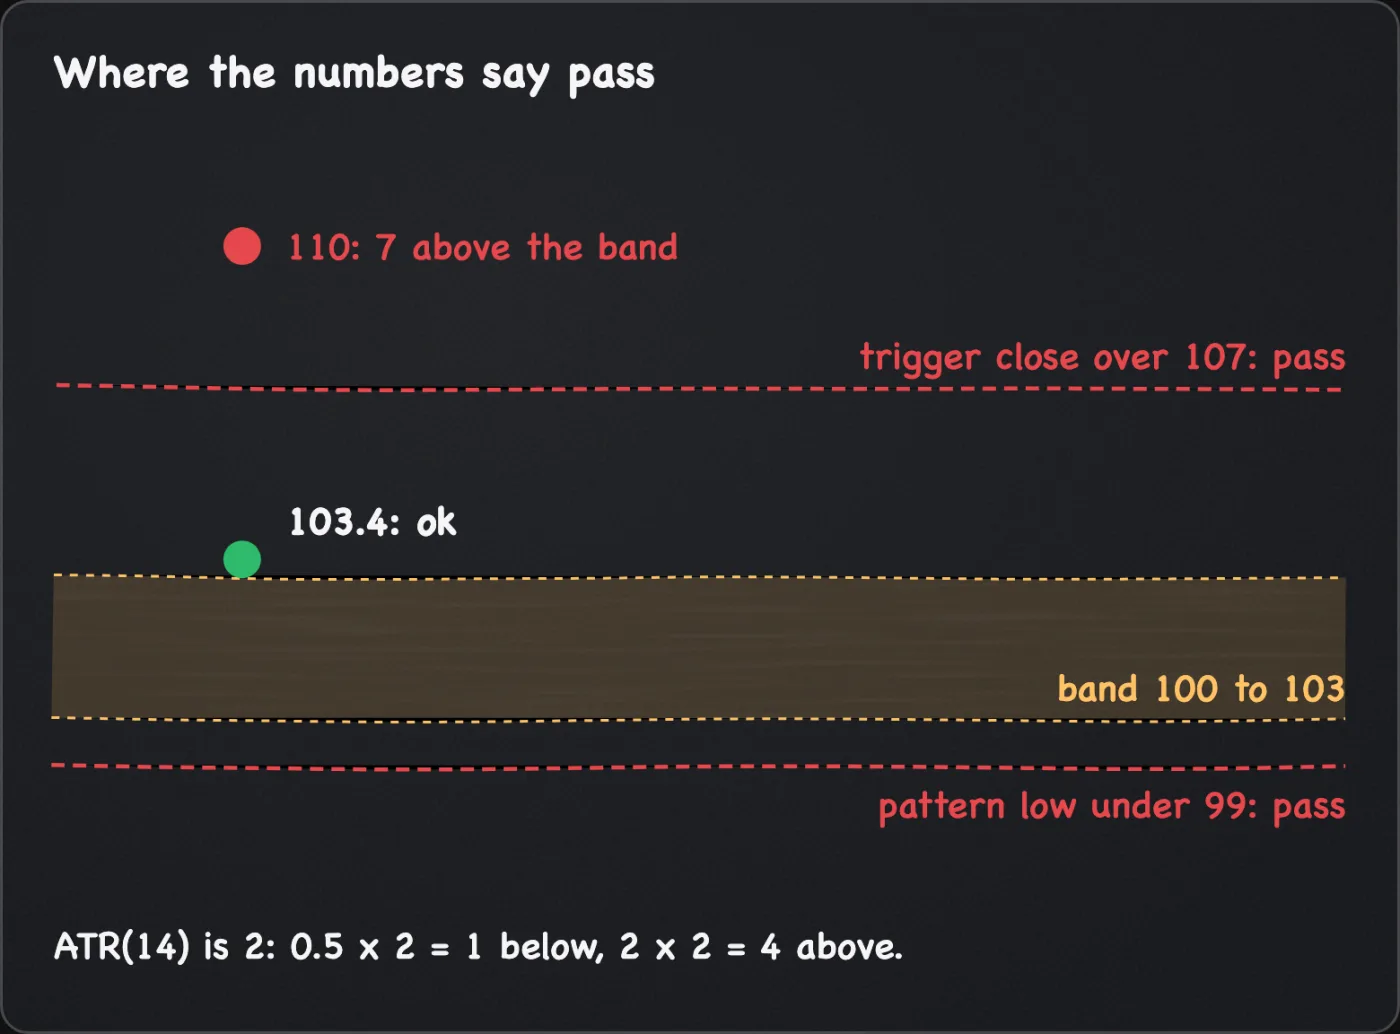
- Not far from the level. The trigger close is no more than 2 x ATR(14) above the band's top edge (assumed).
- Context chart. On the chart above yours (assume the daily), price has not closed below the band.
- Room. The next resistance band was marked before the trigger, and the reward to its lower edge after costs passes a test you wrote before the trade. This manual sets no minimum ratio, and risk to reward gives the break-even share to compare against.
Reasons to pass
Passing is a valid result. Pass when:
- the band was drawn after the pattern, or has fewer touches than your rule
- the prior fall is shorter than your written definition
- the trigger close is more than 2 x ATR(14) above the band's top edge, so the stop is far away
- the size the stop allows is below the exchange minimum, or costs come to more than one fifth of the planned loss. A stop that is too wide for the risk budget is not a reason to shrink the stop. Take the smaller size, or pass
- the pattern's low fell more than 0.5 x ATR(14) below the band, so the band did not hold
- the pattern is a doji or a harami alone, with no trigger close
- no resistance band was marked above entry before the trigger, since this plan's exit is a target and a plan with no target and no trail rule is a pass
- the reward to the next resistance fails your written test, or another band sits just above entry
Entry
Entry on the trigger close
The trigger is the trigger candle's close, so wait for the candle to finish. Place a limit order at or just below that close, or a market order if getting in matters more than the fill price. A limit order expires after 3 candles (assumed). The stop is a reduce-only stop-market sell at the stop price. A stop-limit caps the fill price but can sit unfilled in a gap (order types explains).
Execution assumptions
Assume a limit order that fills at its price, 0.3 per unit for fees and slippage, and a stop-market that fills at the next available price. If price runs away without a fill, do not chase: the stop stays beyond the band, so the distance grows and the reward shrinks. Cancel the order if a candle closes below the lower of the pattern low and the band's bottom edge before it fills.
Hypothetical walkthrough
Hypothetical walkthrough. Invented prices and an invented outcome, chosen to teach the decision. Not a recorded trade, and not evidence of how often this setup works.
The reader writes the plan before the pattern prints: if a 4-hour hammer forms with its low in the 100 to 103 band, after the highest high of the 10 candles before it stood at least 6 above the hammer's low, and a later candle closes above the hammer's high within 3 candles, buy near that close with the stop at 99. A close at 103.4 gives 21 units and a planned loss with costs of 98.7. The next resistance band starts at 112, so the reward after costs is 8.3 against 4.7, about 1:1.8 if every unit closes there. On all-or-nothing arithmetic the target would need to be reached about 36% of the time to break even.
Now change one fact. The next candle closes at 110, not 103.4. That is 7 above the band's top edge, past the 2 x ATR(14) limit of 4. The stop is still 99, 11 away, 11.3 with the allowance, and the reward to 112 is 1.7 against 11.3. The pass is logged with its reason, and the stop is not moved up to make the size fit. The outcome was chosen to show a clean pattern ending in a pass because the trigger was too far from the level.
Exits
Stop. Keep the reduce-only stop-market at the stop price. A decision-timeframe close below the lower of the pattern low and the band's bottom edge means the idea is wrong: close by hand and cancel any unfilled orders. The order stays as the backstop while that close is pending or you are away.
The exit. This page uses one exit, written before entry: a reduce-only limit sell at the lower edge of the next resistance band, marked before the trigger. All the position closes there. A partial exit with a trail on the rest is a different plan, covered on taking profit, and it is written before entry or not used. This plan does not move the stop: it stays at the stop price until the target or the stop fills. A plan that moves it is a different plan, written before entry. The limit may not fill, because a touch is not a fill.
Common pitfalls
- Buying the pattern's own close. The candle is a candidate. Wait for the close above its high.
- Drawing the band around the wick. A band fitted to the wick always agrees with it. Date the band before the candle.
- Treating a doji as the signal. A doji or a harami alone has no direction. Wait for the close.
- Shrinking the stop to fit the budget. A long wick means a wide stop. Take the smaller position, or pass.
- Counting the wick and the band as two reasons. They are largely one observation. The fall before it and the context chart are separate.
What this cannot tell you
- Whether the support holds. A candle at a band shows price visited and left. It does not show the buyers who will return.
- Who bought. A long wick does not show which side was caught, and volume on one candle does not split it.
- Whether the target is reached. The next band is a reference. A band can fail, and a limit order can sit untouched.
- Where the stop fills. A fast market can fill it past the level and make the realised loss larger than the planned loss.
Questions
Which reversal pattern works best at support?
This page cites no test ranking any pattern. It uses three because each has a written definition and a clear high to trigger on. A pattern that fits no definition is not a reason to enter.
Why wait for a close above the pattern's high?
The candle shows where price was pushed back to. A later close above its high shows that price finished a candle above that high. It does not show sustained buying, and it enters later at a worse price. That cost is why the plan checks the distance to the band.