What it is and when it applies
This page helps you decide whether to short a bearish Tenkan-sen and Kijun-sen cross, called a TK cross, or to pass. It acts only on the cross that prints under the Ichimoku cloud, with the Chikou span and the cloud ahead agreeing. The stop goes above the Kijun-sen, and its distance sets the size.
On the chart, price has fallen below the cloud, and on one candle the Tenkan-sen closes below the Kijun-sen. The Tenkan-sen is the midpoint of the last 20 candles and the Kijun-sen of the last 60, so the cross says that the recent midpoint has dropped under the medium one. All lines use this manual's house settings, Ichimoku Cloud (20, 60, 120, 30).
The belief is that a downtrend with the short and medium midpoints turning down can continue. It is a belief, not a rule. The cross is built from the same candles as price, so it follows a fall that has already happened, and this page cites no test of how often a cross under the cloud continues lower. The same overlap applies to the Chikou span and the cloud colour. They agree because price fell.
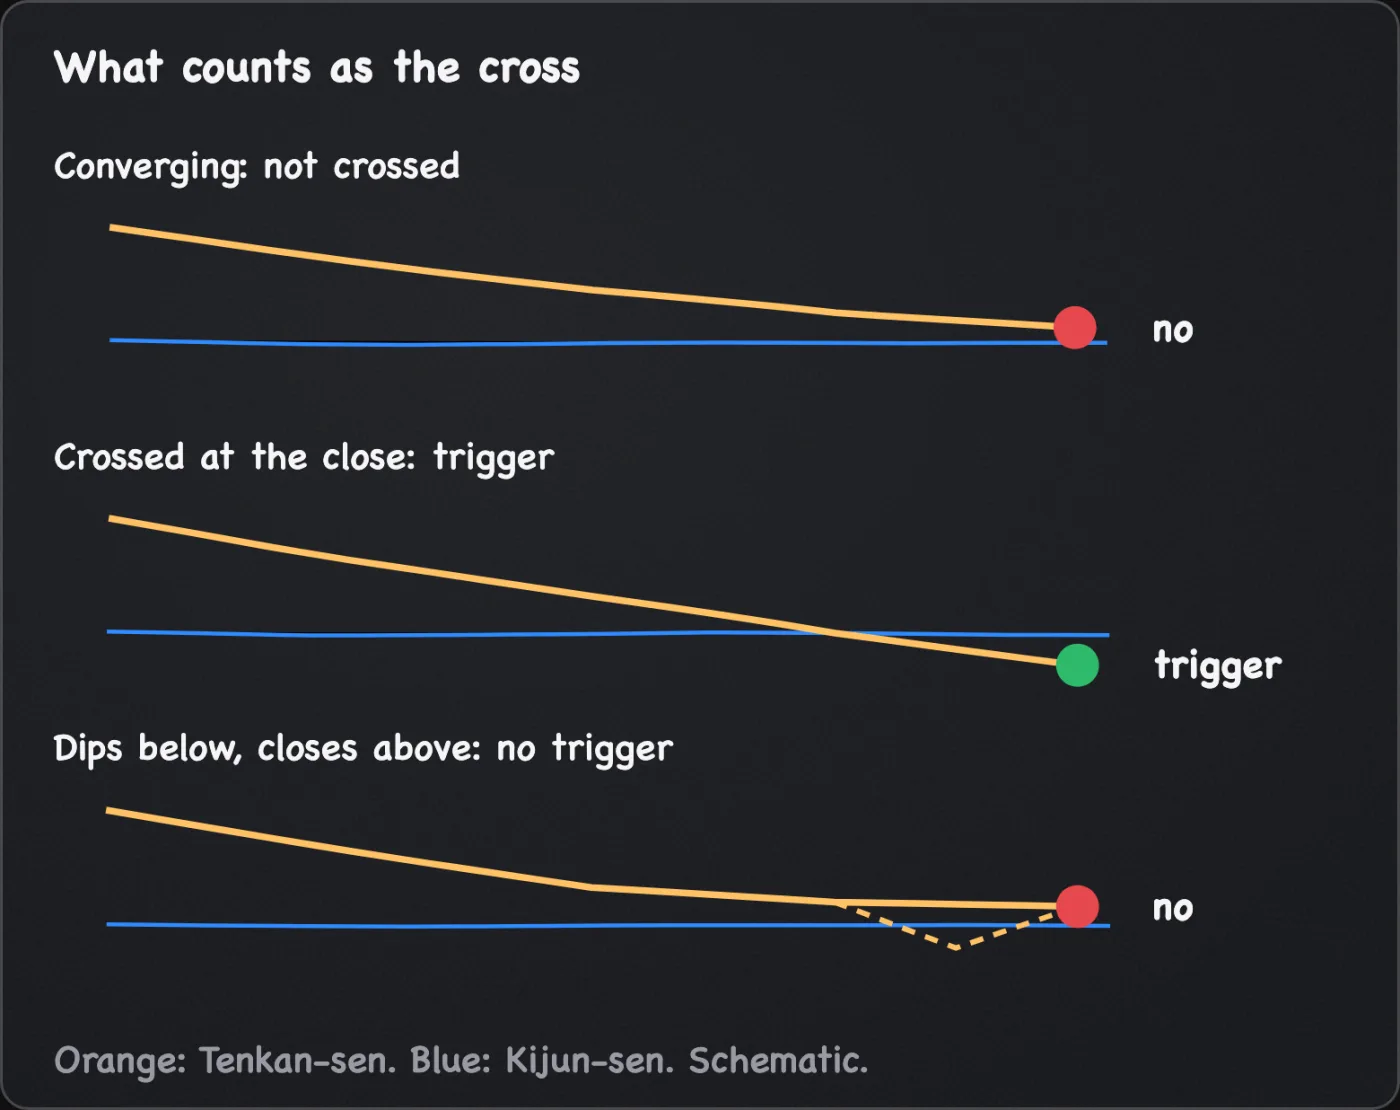
The conditions are strict, so on higher charts there can be long stretches with no qualifying cross. This page cites no count, and a long wait with no entry is part of the setup. Never enter in anticipation of a cross. A Tenkan-sen that is converging has not crossed, and the lines move until the candle closes.
It fits a market that has already fallen below the cloud. It does not fit a range, a cross inside or above the cloud, or a chart where price is far below the Kijun-sen.
Before you enter
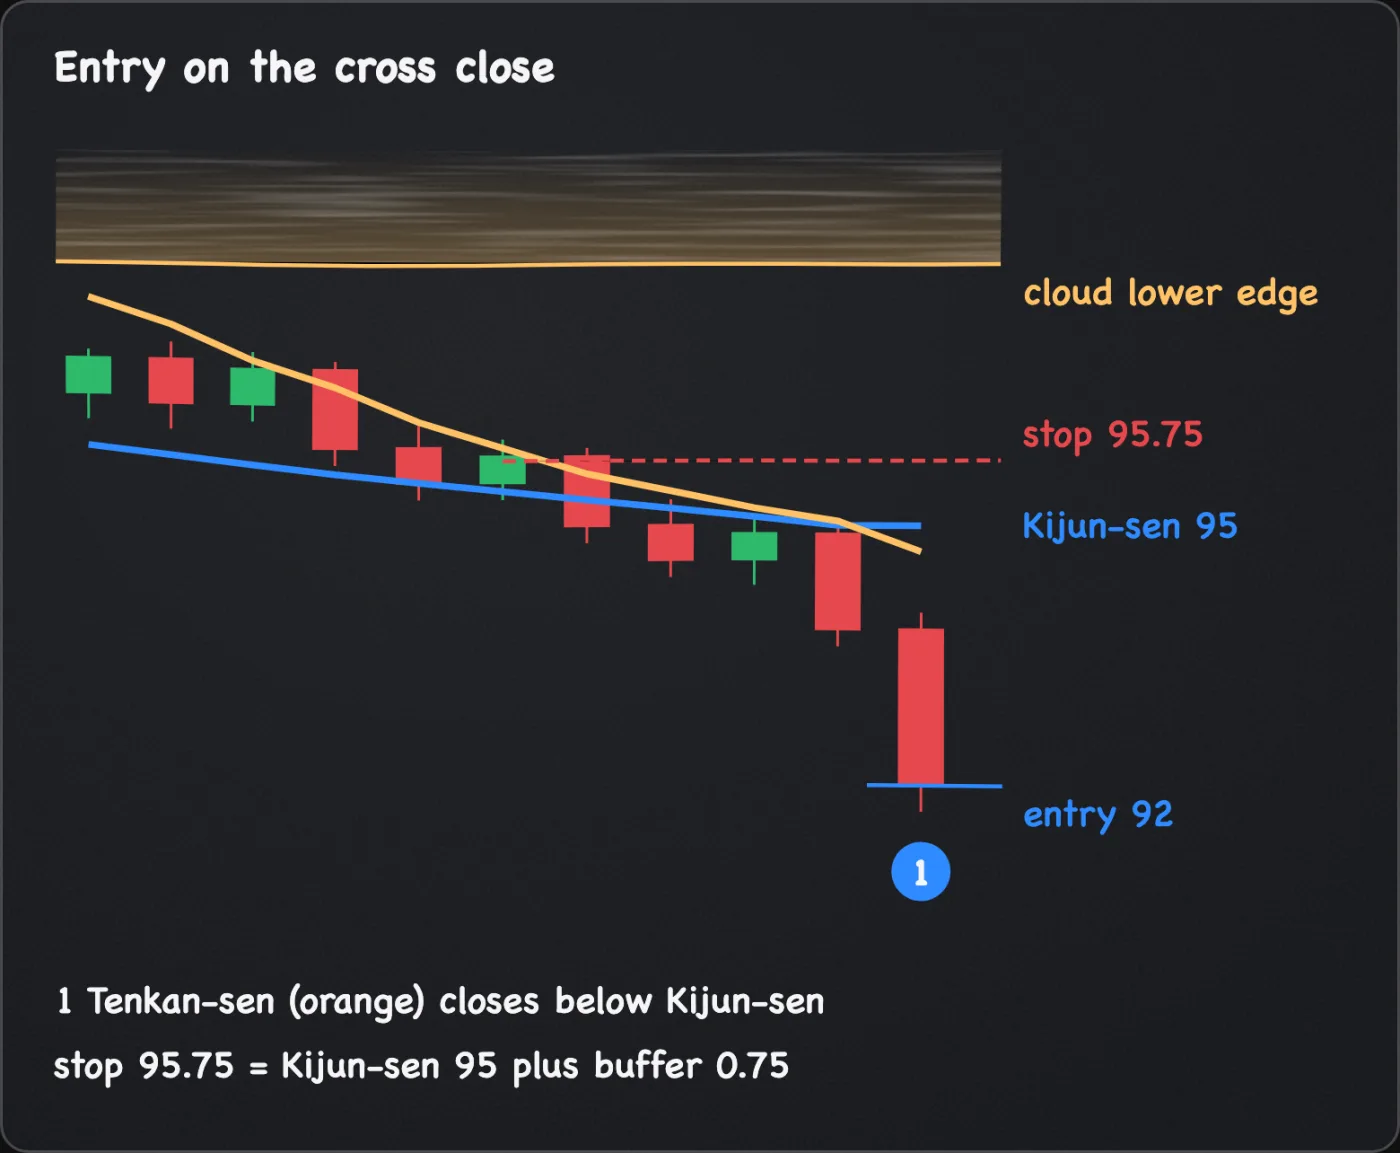
The short is wrong if a candle closes above the Kijun-sen's value on the trigger candle (95 in the example below). The cross has then failed to hold. The stop order goes at the Kijun-sen's value on the trigger candle plus a buffer, so a wick through the line does not end a trade that is still alive. The examples assume a buffer of 0.5 x ATR(14), the manual's usual convention and not a rule. A wider buffer takes a bigger move to reach and shrinks the position, and a tighter one does the reverse. Stop-loss placement explains the level, the close and the order.
This manual's house constraints are a planned loss of 1-2% of the account per trade and a 3x maximum leverage. They are choices, not a recommended allocation, and less, or no position, is always allowed. Sizing inputs:
- Account risk: the planned loss in cash, 1-2% of equity or lower.
- Entry price: the assumed fill, near the trigger candle's close.
- Stop price: the Kijun-sen on the trigger candle plus the buffer.
- Cost allowance: a per-unit amount for fees and slippage, added to the stop distance, plus funding for the planned hold. The examples assume 0.3 per unit, an illustrative figure (trading costs and liquidity covers it). A short on a perpetual can pay funding, so check the rate.
- Leverage cap: the leverage setting, and all open position values plus this one over account equity, 3 or less.
- Liquidation distance: the ticket's estimated liquidation price, above the stop for a short. If the gap is not wide, lower the leverage setting.
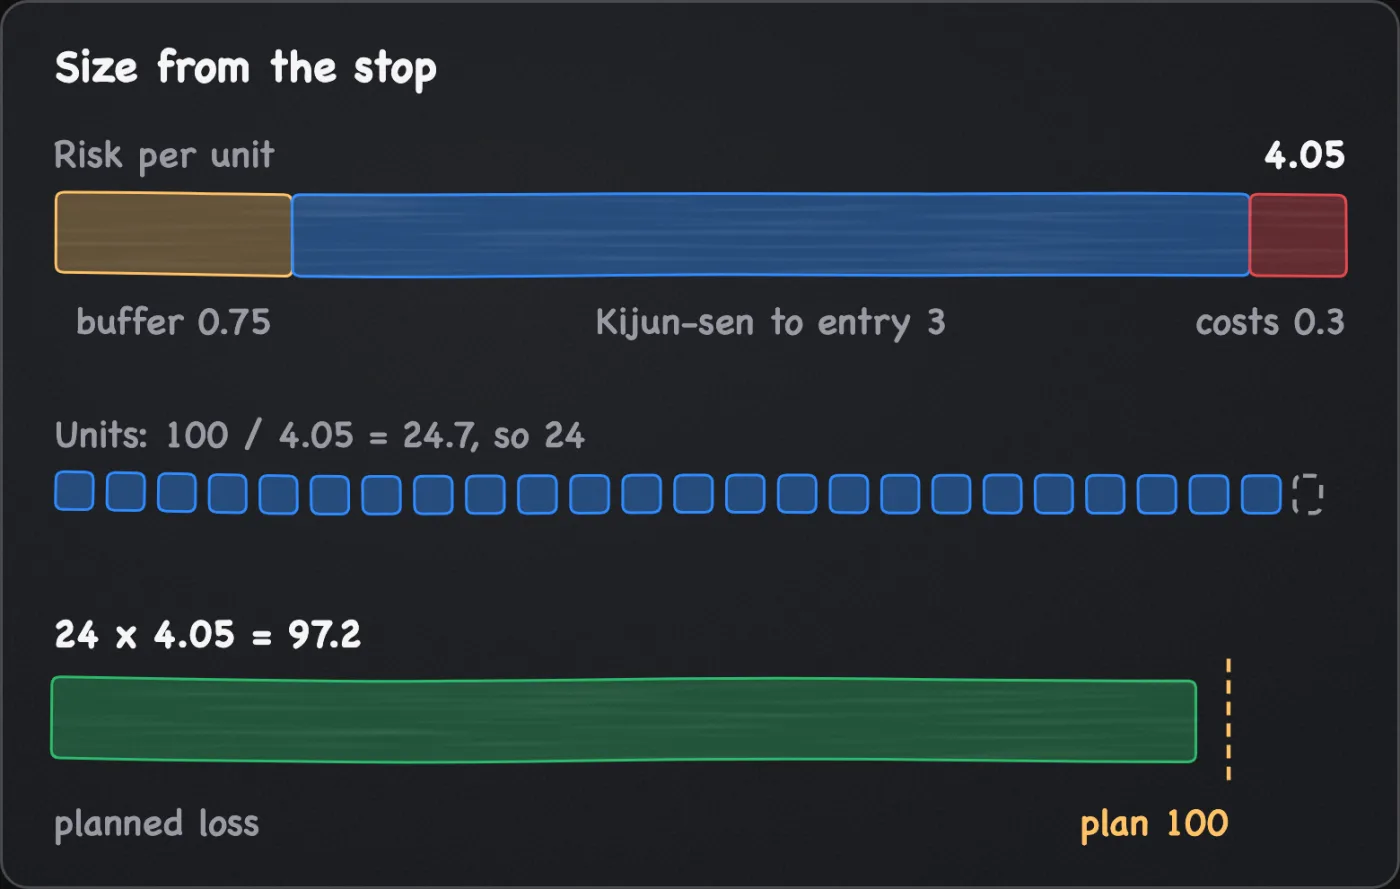
Units = planned loss / (stop minus entry, plus allowance), rounded down (position sizing has the sum). Units x (distance + allowance) is the planned loss if the stop fills at its price. A gap, slippage or funding can make the realised loss larger.
For arithmetic only, assume a 10,000 account, a planned loss of 1%, or 100, and ATR(14) of 1.5, so the buffer is 0.75. A 4-hour candle closes at 92 with the Tenkan-sen just below a Kijun-sen of 95. The stop is 95.75. Entry at 92 is 3.75 from the stop, 4.05 with the allowance. The size is 100 / 4.05, about 24.7, so 24 units (assume whole units), worth 2,208, or 0.22 of the account. The planned loss with costs is 24 x 4.05 = 97.2, and costs are about 7% of it.
Conditions
Each of these must be checkable on the chart. The thresholds marked as assumed are house choices that you write down before the trade.
- The cross. At the close of the trigger candle the Tenkan-sen is below the Kijun-sen, and on the candle before it was at or above it.
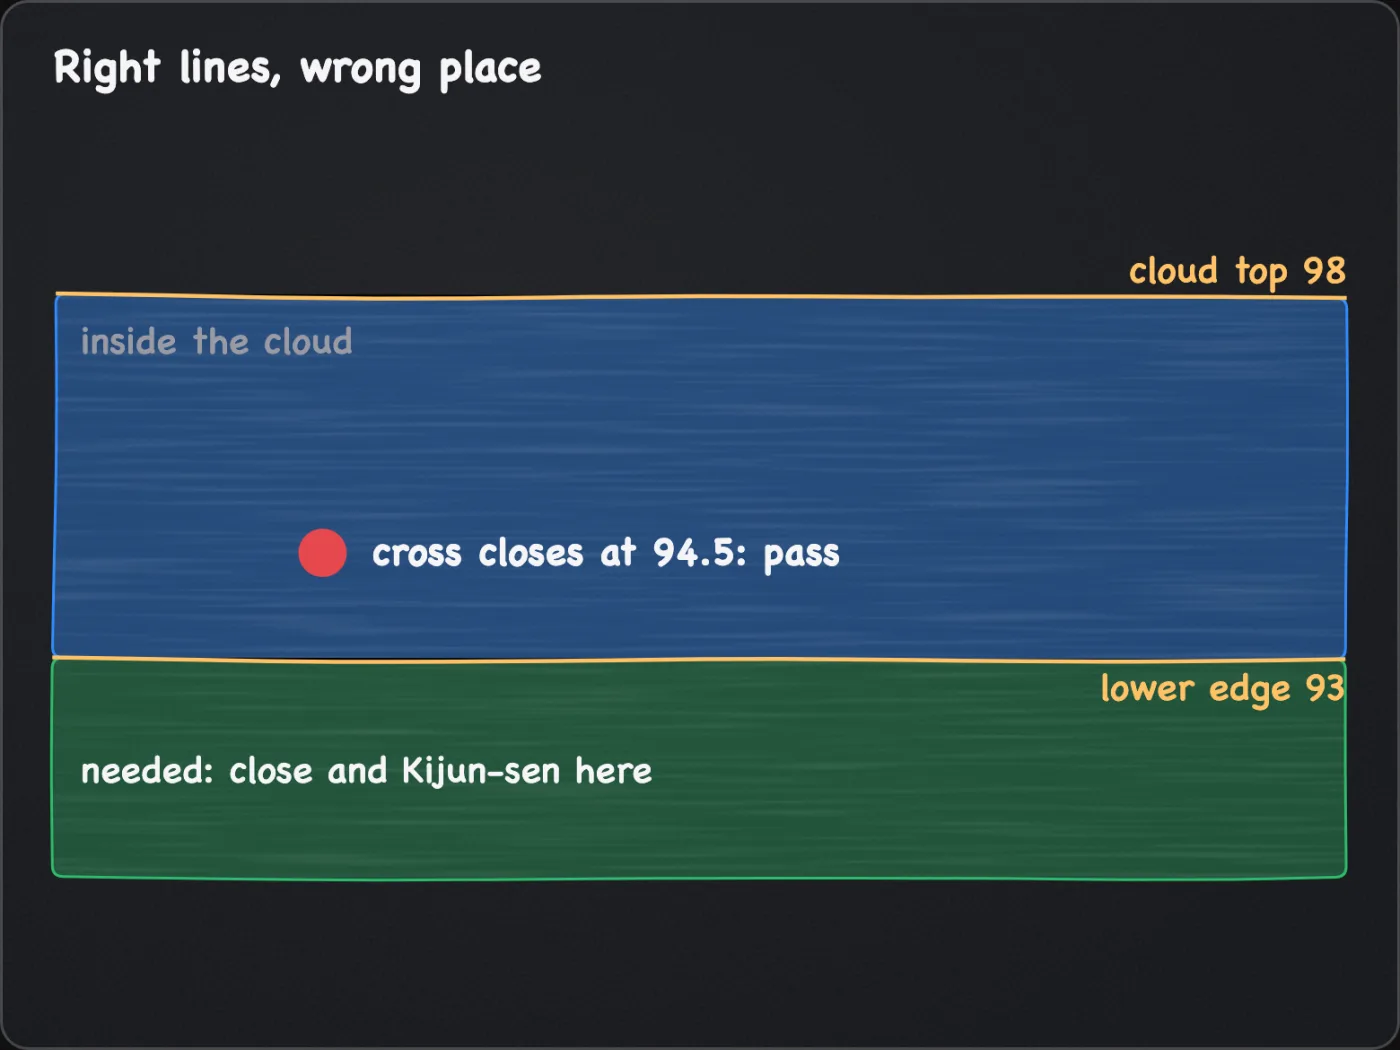
- Under the cloud. The trigger close and the Kijun-sen are both below the lower edge of the cloud under the trigger candle. The two lines are close together at a cross, so this puts the cross under the cloud. A cross inside or above the cloud is a pass.
- Below the Kijun-sen. The trigger close is below the Kijun-sen, so the stop sits above entry.
- Chikou span clear. The trigger close is below the low of the candle 30 back.
- Cloud ahead red. Span A is below span B on the latest candle. A cloud that turned red recently and one that has been red for weeks both pass.
- Not a range. The Kijun-sen and the cloud's lower edge are not both flat. Flat means the value now differs from its value 10 candles earlier by less than 0.5 x ATR(14) at the latest candle (assumed).
- Not stretched. The trigger close is no more than 3 x ATR(14) below the Kijun-sen (assumed).
- Context chart. On the chart above yours (assume the daily), price is not above its own cloud.
- Room. If a marked support band sits below, the reward to it after costs passes a test you wrote before the trade. If nothing is marked below, the exit rule is the plan.
Reasons to pass
Passing is a valid result. Pass when:
- the cross is inside or above the cloud, or the Tenkan-sen has not yet crossed
- the trigger close is at or above the Kijun-sen
- the cloud ahead is green, or span A is equal to or above span B
- the Chikou span sits inside the candles 30 back
- the Kijun-sen and the cloud are both flat
- the trigger close is more than 3 x ATR(14) below the Kijun-sen
- the size the stop allows is below the exchange minimum, or costs and funding come to more than one fifth of the planned loss
- a marked support band sits just below entry and the reward fails your written test
Entry
Entry on the cross close
The trigger is the trigger candle's close, so wait for the candle to finish. Place a limit order at or just above that close, or a market order if getting in matters more than the fill price. A limit order expires after 3 candles (assumed). The stop is a reduce-only stop-market buy at the Kijun-sen plus the buffer. A stop-limit caps the fill price but can sit unfilled in a gap (order types explains).
Execution assumptions
Assume a limit order that fills at its price, 0.3 per unit for fees and slippage, and a stop-market that fills at the next available price. If price falls away without a fill, do not chase: the stop stays put and the reward shrinks. Cancel the order if a candle closes back above the trigger candle's Kijun-sen value before it fills.
Hypothetical walkthrough
Hypothetical walkthrough. Invented prices and an invented outcome, chosen to teach the decision. Not a recorded trade, and not evidence of how often this setup works.
The reader writes the plan before the close: if a 4-hour candle closes under the cloud with the Tenkan-sen below the Kijun-sen of 95, the Chikou span clear and span A below span B, short near the close with the stop at 95.75. A close at 92 is 2 x ATR(14) below the Kijun-sen, so it passes. The size is 24 units and the planned loss with costs is 97.2.
Now take a second chart. A cross with the same Kijun-sen of 95 prints on a candle that closes at 94.5, inside a cloud that spans 93 to 98. The short has the right lines in the wrong place, so no order exists. The pass is logged with its reason. The outcome was chosen to show a clean cross ending in a pass because it sits inside the cloud.
Exits
Stop. Keep the reduce-only stop-market at the Kijun-sen plus the buffer until the exit rule moves it. A decision-timeframe close above the Kijun-sen's value on the trigger candle (95 in the example) means the idea is wrong, even if the live line has since moved: close by hand and cancel any unfilled orders.
The exit. This page uses one exit, written before entry: the Chandelier Exit trend ride, set to Chandelier Exit (22, 3.0). The Kijun-sen is the first stop, and the close-above-that-value rule holds until the handover. The ride hands over to the line once it moves below that stop, and the stop only moves toward price. After the handover the line is the nearer level, so it governs and the trigger candle's Kijun-sen value is no longer checked. The Chandelier line follows the lowest low at a distance set by ATR, where a 60-candle Kijun-sen lags a fast fall. The same lag would apply to a Kijun-sen exit on the long pages. This manual's three Ichimoku setups use three different exits as conventions, and this page cites no test that any one is better.
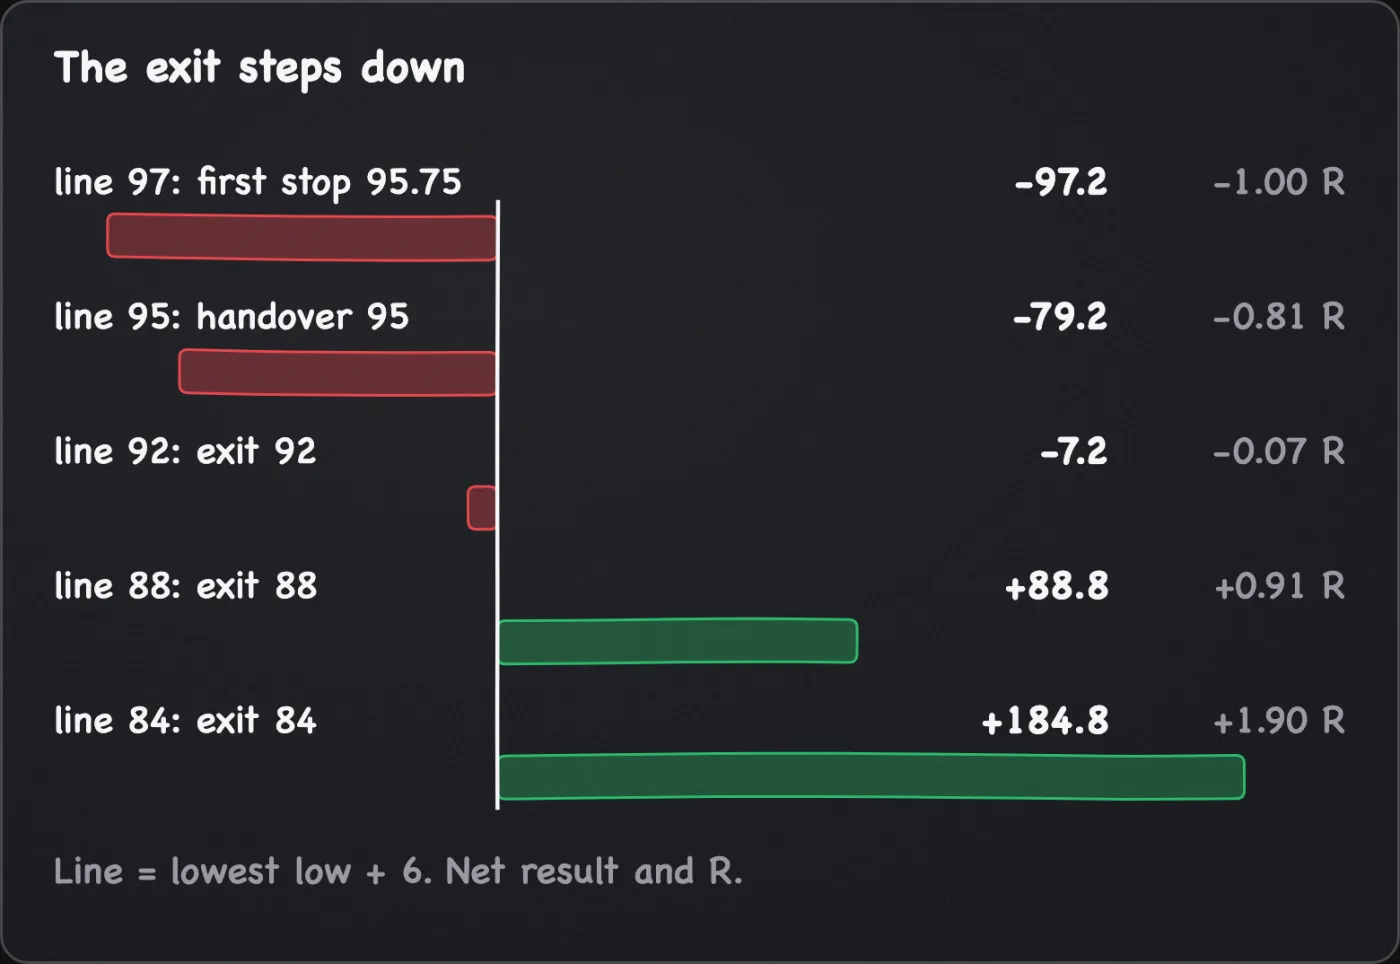
For arithmetic only, assume ATR(22) of 2 throughout, so the line is the lowest low plus 6. Each result is 24 x (92 - exit - 0.3), and R is 97.2.
| Lowest low | Chandelier line | Exit level | Net result if it fills there | R |
|---|---|---|---|---|
| 91 | 97 | 95.75, the first stop | -97.2 | -1.00 |
| 89 | 95 | 95, the handover | -79.2 | -0.81 |
| 86 | 92 | 92 | -7.2 | -0.07 |
| 82 | 88 | 88 | +88.8 | +0.91 |
| 78 | 84 | 84 | +184.8 | +1.90 |
The rows are a ladder of stop positions, not a forecast that price falls. The table takes the exit at the line on a close, as the trend ride page's default has it. The backstop order sits a buffer beyond the line, 0.75 here, so if the order fills instead, each unit does 0.75 worse and the result is 18 lower. R stays measured against the original 97.2. There is no fixed target.
Common pitfalls
- Shorting the approach to a cross. The Tenkan-sen has not crossed until a candle closes with it below. Wait for the close.
- Taking a cross inside the cloud. The table on the Ichimoku page says pass. A cross there sits between lines that disagree.
- Treating the three agreeing checks as three reasons. They overlap. Weigh the context chart and any support band separately.
- Ignoring funding. A short can pay it. Put the planned hold's funding in the cost allowance.
- Retuning to get more crosses. A set fitted to the last move is fitted to it. Keep the house settings or fix your own once.
What this cannot tell you
- Whether this cross is the start of a decline or the end of one. A cross follows price, so it can print after much of a fall is already done.
- How far price falls. The Chandelier line follows the move. It gives no target.
- Whether the market squeezes you. A short in a crowded market can meet a sharp rise that clears the stop before any close.
- Whether both lines are falling. The cross says the 20-candle midpoint is below the 60-candle one, not that both are turning down.
- Where the stop fills. A fast market can fill it past the line and make the realised loss larger than the planned loss.
Questions
Does this work long?
The conditions mirror: the Tenkan-sen closes above the Kijun-sen, price is above the cloud, the Chikou span is above the high 30 candles back, and span A is above span B. This manual has no page for the mirror, because its long Ichimoku entries are the Kumo breakout and the Kijun-sen reclaim. This page cites no test of the cross on either side, so neither is established.
Why not enter when the Tenkan-sen is about to cross?
The lines move until the candle closes, and a cross that looks certain can disappear. An entry in anticipation has no trigger to write down and no close to judge it by.
How often does a qualifying cross appear?
This page cites no count. The conditions are strict, so many charts will have none for long stretches. A plan that passes through those stretches is following its rules.