Definition
A breakout is price moving through a level it had not crossed, such as a prior high, a support or a trendline. A retest is price coming back to that level from the other side. A break counts only by a rule you fix in advance, and a retest shows how the level holds once, not where price goes next.
Use it to decide whether a break is worth a plan, where the idea is wrong (back through the level), and whether to enter on the break, on the retest or not at all.
How it works
What counts as through
A wick through a level proves little, because it can come back within the same candle. Three rules are in common use, and each trades filtering against entry price. All three are choices, so fix one in the plan before the break.
- A close beyond the level on the timeframe the plan is read on. This is the usual convention.
- A close beyond the level plus a buffer, such as half an ATR. It rejects more candidate breaks and usually enters later.
- Two closes in a row beyond the level. It also rejects more, and can enter later than the buffered rule.
For arithmetic only, assume resistance at 100 and ATR(14) of 2. A close above 100 counts under the first rule and a close above 101 under the second. Stricter rules reject more candidate breaks, real ones included, and what they enter is usually at a worse price.
How a breakout fails
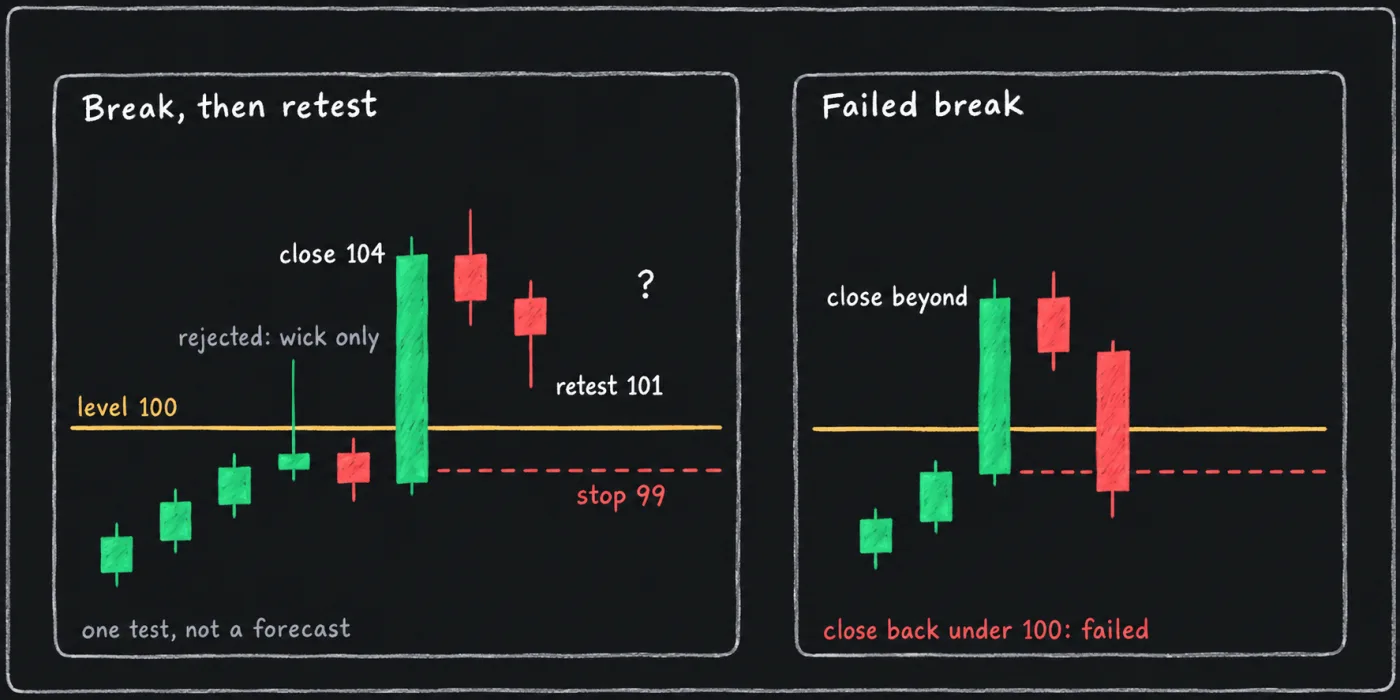
A breakout fails when price closes back on the original side of the level. The level is the invalidation: for a long above resistance at 100, a candle closing back under 100 means the break failed. That close rule and the stop order are two separate things. The order sits beyond the level with a buffer, as stop-loss placement explains, and it can fill before any candle closes, or never fill if price closes under 100 without reaching it. Whichever happens first ends the trade. A wick that goes above the level and closes back under it does not satisfy the close rule, so by this page it is a rejected attempt and not a break. A failed break is not a surprise. It is the stated condition on which the plan is wrong.
What a retest can show
After a break, one of three things happens at the level: price comes back and holds, comes back and closes through, or never comes back. Define "holds" as you defined "through", usually as a close that stays on the breakout side.
Take the same level at 100, a break that closes at 104 and an assumed stop at 99, half an ATR beyond the level.
- Entering at the break close, 104, puts the stop 5 away. A planned loss of 100 buys 20 units.
- Entering at a retest, 101, puts the stop 2 away. The same planned loss buys 50 units.
This assumes a linear contract and leaves out fees, slippage and funding, which a 2-point stop feels more than a 5-point one. With those entries and that stop, a retest entry has a shorter stop distance, and the position size and reward to risk change with it (see position sizing). A larger position is not an advantage in itself, because the planned loss is the same. The retest also gives a visible test of whether the price condition holds once.
What a retest cannot show
A retest that holds is one observation. It does not confirm continuation. Price can hold the level, tick up and reverse later, and a holding retest is also what the first leg of a failed breakout can look like. A retest that never comes tells you nothing about the break, only that this entry is gone. Chasing the move instead stretches the stop distance and shrinks the size, so passing is allowed. A level is better treated as a zone than a single price, so write down how close counts as a retest (support and resistance covers marking the zone). This page cites no test of how often retests hold, or whether retest entries beat entries on the break.
Volume is a second check traders add on the break, and volume covers what it can and cannot show.
Default settings
There is no published definition of a valid breakout. The table lists the usual convention and variations, each of which the reader fixes in the plan.
| Setting | Rule | Status and trade-off |
|---|---|---|
| Convention | A close beyond the level on the plan's timeframe | The usual starting point. A wick alone does not count. |
| Variation: close beyond a buffer | The close clears the level by a fraction of ATR(14). The example assumes 0.5 | Rejects more candidate breaks and usually enters later. |
| Variation: two closes | Two consecutive closes beyond the level | Rejects more and can enter later than the buffered rule. |
| Retest holds | A close stays on the breakout side | A choice made before the break, so it cannot bend to fit what price did. |
| Retest window | A number of candles after which the entry expires | An assumption the reader fixes. Without one, a late retest can become a different trade. |
How it is used in this manual's setups
- Ending diagonal breakdown. Its first entry waits for a close below the lower line and then for a bounce that fails, which is a retest from below. Its second shorts the close below the line itself.
- Breakout continuation long. Price clears a prior high and holds it as support, so the retest is part of the setup.
- Failed breakout wick short. It trades the rejected attempt, a wick above resistance and a close back below.
- Trendline break retest short and EMA 55 resistance break long use the same close rule on a trendline and a moving average.
The level is marked from structure first, and the break rule above is applied to it.
Common mistakes
- Calling a wick a break. Wait for the close your rule names.
- Changing the rule after seeing the candle. A threshold fixed after the fact fits whatever price did.
- Treating the retest as confirmation. It is one observation. Size and stop come from the plan.
- Putting the stop inside the level. A retest can trade back into the level before the idea is dead, so the stop order sits beyond it.
- Chasing a break far from the level. The stop distance grows and the size shrinks. Wait for a retest or pass.
- Waiting without an expiry. Set a window after which the entry is cancelled.
What this cannot tell you
A close through a level cannot tell you whether price continues. Some breaks are followed by a move and some are the start of a failed breakout, and the close rule cannot separate them in advance. A retest that holds cannot confirm the move, because it is one test at one moment. Neither can tell you why price behaved as it did at the level. And the rules here depend on the timeframe: a close on a 15-minute chart can sit inside a single 4-hour candle, so the same break can count on one chart and not on another.
Questions
What is a breakout and retest?
A breakout is price closing beyond a level, and a retest is price returning to that level from the other side. The break counts by a rule you fix first, and the retest is one test of whether the level now holds.
Does a retest confirm a breakout?
No. A holding retest is one observation and price can still reverse after it. In the worked example it gives a closer stop than entering at the break, which is a sizing fact, not a forecast.
How do I tell a false breakout from a real one?
You cannot tell in advance. Write the failure condition into the plan, usually a close back through the level, and treat that close as the end of the idea.